Friday, September 28, 2012

big pillow


This is my big pillow.  It was fairly easy to make. All it is is a jelly roll for the top.  I used a patch from a different fabric and sewed it in the middle to cover the whole that was there.  I then used a completely different fabric for the back side of it.  I cut all the long jelly roll slices in half.  After which I sliced them into triangles, obviously not very even ones. I was trying to be quick about making this.  I then sewed the triangles together. I did it in sections then sewed all the sections together.  My middle looked really weird, and it didn't turn out the way I expected. It was really simple though, until my machine broke.  But, I got it back, and finished my pillow. I used 3 and a half old standard size pillows to stuff this one. The next one I make I will stuff with pellets and do according to someones tutorial.  There are a couple good ones out there.  So, if you want to try your own, I suggest This site.  I need to learn the "trimming" part of the tutorial.....I thought that was a little hard to understand! But, I like the way mine turned out.  Here are some more pics of my pillow:

back

puppy likes


Reorganizing part 1

I reorganized our craft room.  I started with getting my fabrics in order, while he got his painting stuff in order.  I used cardboard box pieces to roll my fabrics over 1 yard.  And have a box full of anything less than a yard.  I didn't realize how much scrap fabric I had.....I have got to figure something out for all that fabric.  I have also organized my bundles. Of fabric into type and pattern.  The stuff on the top shelf is jelly rolls and quilting squares, also interfacing and pre-rolled fabric from walmart's clearance rack. I didn't feel like unrolling it til I need it.  I also have my sheer fabric up there. My bottom shelf is my few knits and fleece.  My middle shelf is my basic fabric.....I think its called broadcloth.  On the very top is some of my finished or almost finished stuff and speakers so I have music.  Next I need to work on my notions....ribbon, needles, thread, etc. That's going to be the hard part.  Once I get that done and I get my sewing machine back from the repair guy Ill be ready to go. 


Thursday, September 20, 2012

Candy corn pillow

This is my candy corn pillow.  It was really simple to make.  It was so much fun to make.  3 different fabrics, make a triangle, sew and stuff.  I will post a tutorial later.  Currently my sewing machine is out of order. I need to get it serviced before I can do anything else! When I do I will have more things to post. I have started several projects and tutorials but can't finish them.... :(  It's ok, hopefully I can get back to it soon!


You might also be interested in:


Friday, September 14, 2012

first shirt

I made a shirt. It's my first shirt.  No pattern, barely any measurements! Very simple to make.  Sorry, I didn't take pictures during the whole ordeal, but it really was simple.  I got my inspiration from THIS page.  Very, very cute.  hope you like my shirt! I do!

 This shirt took 4 panels of fabric.  I wanted the edge of the sleeves and the bottom of the shirt to be the same style.  I got this fabric at Walmart! I cut 4 panels all the same length and width.  To get the right length (especially for the bottom part) I used the widest measurement on my body.  For me it was rounded to 40 inches.  I decided that my chest is the widest part and I wanted it to fit over my chest so I could wear it.  I divided this measurement by 2.  I did this so I had two panels, one for the bottom of the front of the shirt and one for the bottom of the back.  The panels that went over the arms were the same length as well.  This may or may not work for everyone depending on how long or short you want the shirt. I sewed the two bottom panels together to get a circle.  I then decided where the shoulders were to go and sewed a deep V front and slight V for the back. I sewed this onto the circle.  Finish the seams and voila! you have a shirt. 4 panels! aprox 30-60 minutes! very little measuring and no pattern! super simple!
This is the back! I plan on going back and putting bias tape on the shirt around all the seams. This way it will finish the seams a lot nicer and hopefully keep the fraying to a minimum. 


You might also be interested in:

infinity dress

Dress form tutorial
    

Wednesday, September 12, 2012

Starting my t-shirt quilt

So, the main reason I wanted a sewing machine was to make a quilt.  Not just any old quilt, but a t-shirt quilt.  I have been collecting t-shirts over the years.  All sorts of shirts.  I have shirts. From church events, and some from grade school up to college, some from sporting events and some from places I have been. I have big squares, little squares, and even some rectangles. 

Tonight I started on this quilt.  I cut up all the t-shirts, and hopefully not the duplicates.  I'm going to try to start putting it together tonight also, but I don't have a space big enough without the animals being around.  My sewing room trash is full, and I have plenty of left over shirt pieces for filler if needed.  I have several thoughts on how I am going to do this.  One is to put all the big pieces together then add the little and long.  One is to start with the little pieces together in the middle and go out from that with everything else.  Its probably going to take me a while to do this, and lots of thread.  I will be keeping all of you updated as the project progresses and end it with the final look.  Let me know if there are any suggestions out there. 


Tuesday, September 11, 2012

My dress form--tutorial

So I have been seeing people online have been making their own dress forms out of all sorts of things.  After finding this out, I decided to give it a try.  I won't really know how it worked til I make some clothes.  However, I think it looks alright.  Well, I decided to do my own tutorial. Hopefully this will help anyone out there who, like me, is in need for a dress form but is poorer than poor.

THIS is where I got the idea!

Make sure you do a couple things first.....where a bra and a "tight" under shirt.  

So lets get started.  You need to start with materials.  You need a shirt that is too large for you, for me I got a men's XXL T-Shirt from walmart (on sale for $3).  You also need some duct tape.  Depending on your size you shouldn't need more than 2 rolls.  I bought 3 just in case.  I only used 1 on the form and part of one for the end of the project.  You also need some cardboard for stabilizing and some stuffing......


 This is my shirt and tape.


You also need your trusty helper.....can't wrap yourself in duct tape.  I chose my husband!


For cardboard.....I went and got some from work (walmart).  and the stuffing came from old pillows that aren't being used.


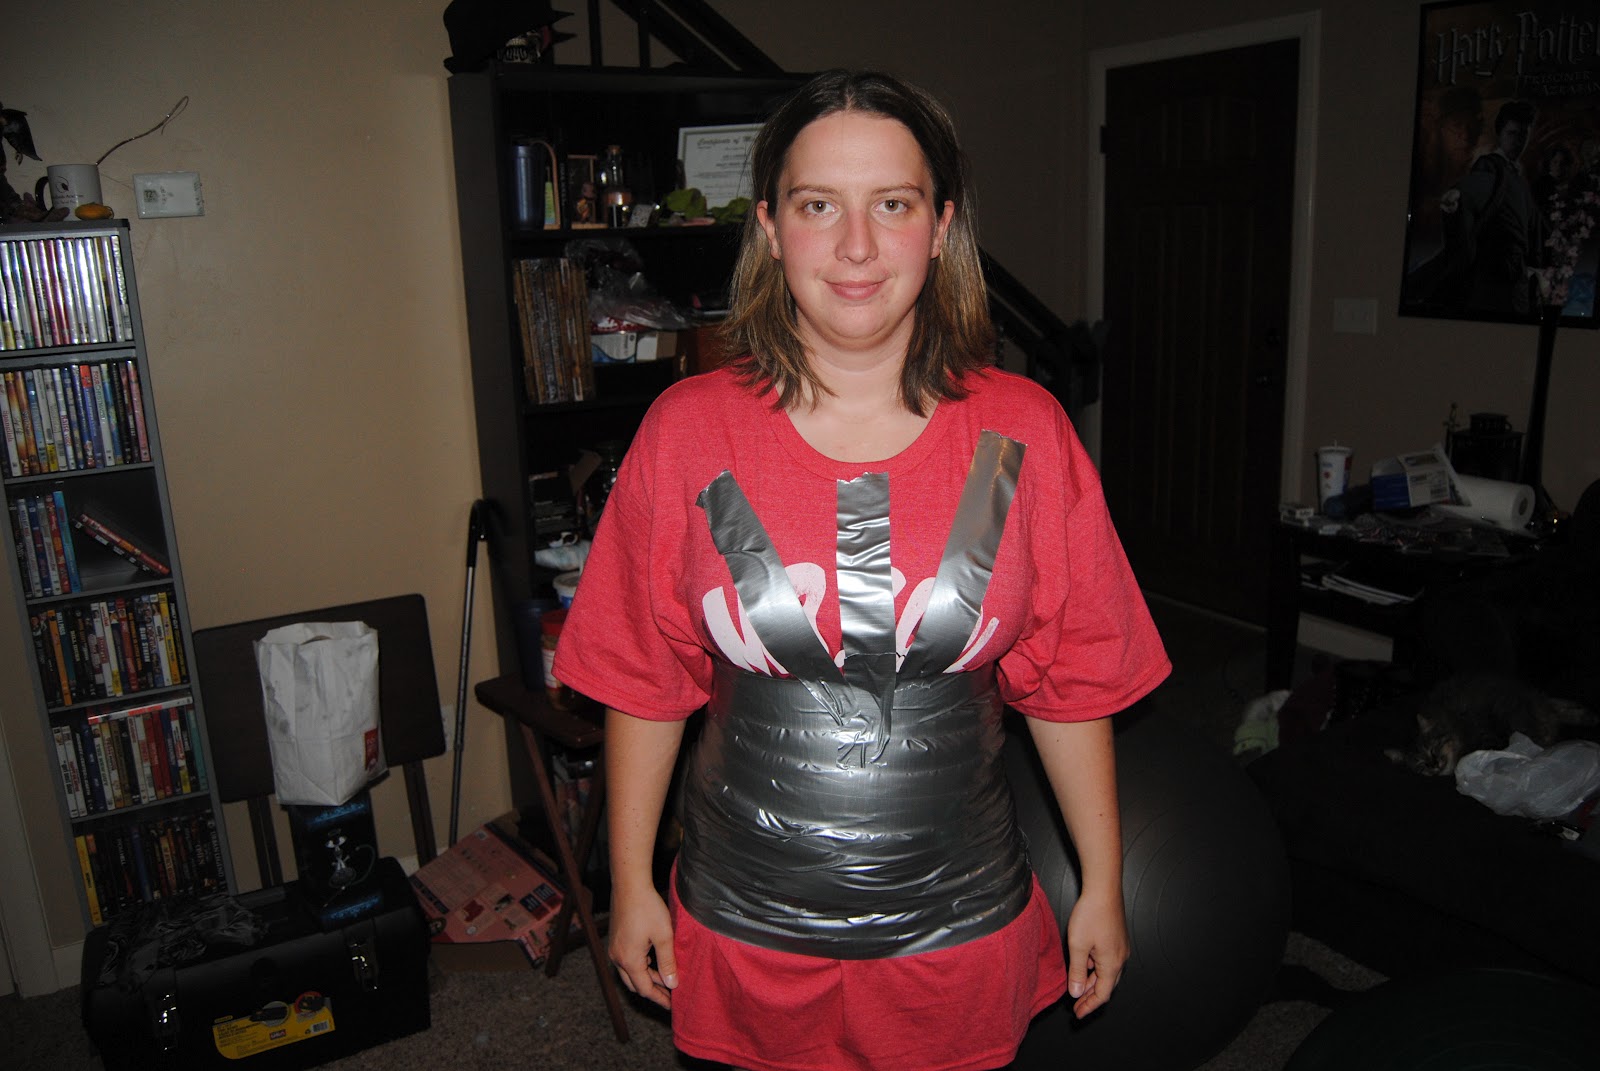
Start wrapping the duct tape from.  Start and the lowest point you want the form.  I have a big butt so I started there.  You can start lower or higher, depends on your shape.


When you get to the chest, start wrapping the tape up and down instead of around.  The up and down wrapping helps form the chest better.  I tried going around, but it made the chest look flat.....up and down is definitely best.


Keep doing the up and down wrapping over your chest, shoulders and upper back.

While doing this, form the neckline you want and the arm holes.


When you get it wrapped to your satisfaction, draw and line down the center and and horizontal lines where you want them.  I did one across the center of the chest, under the boobs, and across my belly button.


Very carefully, cut the form off on the back.  Make sure not to cut the shirt or bra when you are cutting this.  After you cut slip the form off very carefully and, without overlapping, carefully tap over the cut to finish your form.


Cut out the cardboard to fit the bottom of the form and tape it to the form (sorry no pics of this). then stuff your form from the top.  You can also put card board in the arm holes to help those keep shape.  Where this is my first form I was getting tired so I didn't do that part.


When you are done with your form it should look a little like this. 


You can stick a hanger in the top to hang it....which is what I plan. I am going to put a hook in the ceiling and hang it from that when using and putting it in the closet when I'm not.  OR, you can make a pole out of cardboard or whatever and afix your form to that.  I'm not that handy so you can figure that out.


I hope my dress form works out for me.  I'm going to be making my first item using it tomorrow!  I'm going to be making a jumper so look out for another tutorial.  It'll be great if this works.  I am looking at getting a dress form from amazon at some point.....one of those adjustable ones.  But for now, this should work.  Hope you enjoyed the tutorial and hope it helps you make your own dress form!


Tuesday, September 4, 2012

Turtle time

I made this little turtle.  It was fairly easy, just make sure the fabric doesn't bunch when you sew it all together.  Im going to be giving this little guy to my nephew next time I see him.  It took me around 45 min to an hour to cut stuff and sew everything. It was fun to make.  The most difficult part was turning out and stuff the tail.  The next turtle I make I will sew it a little differently so the feet, head, and tail don't flop around.  But isn't he just a cutie!


 These aren't the greatest pictures. for some reason the flash on my camera wasn't working. I'll fix the bugs for the next thing I sew!


If you wish to make your own turtle, visit THIS link!  Very awesome stuff. 


You might also like:

Monkey
yoda
Turtle

Penguins


Monday, September 3, 2012

infinity dress try 1

I have been seeing this dress everywhere and decided to give it a try.  However, my downfall was I didn't have enough fabric.  I only had 3 yards to do skirt, straps, and all.  I also made the mistake of doing it with a non stretchy fabric so I had to add a zipper! My straps are a little short due to a shortage of fabric and the store had no more of the same fabric.  So I may be limited in what I can do, but it's still a fun dress to make and wear.  I thought the material is fun too.  I have another fabric, same material except all green, I want to make this same dress out of it.  Hopefully I have enough this time, however I think I'm going to need to get more!  Ahhhhhh! The only down side to this dress is the amount of fabric you have to get.  I want to try this with a knit fabric (like it's supposed to be down with) but I have never worked with knits nor do I know where to get them.  So, Here are a few pics of the dress.  I hope I have impressed with this!


***Sorry the photos are kind of blurry/horribly taken.....I'll have my husband take some at a later date.

Saturday, September 1, 2012

thanksgiving for puppy

 I made this little apron dress for my baby to wear on Thanksgiving.  I intend on her and I both wearing our aprons while I cook dinner and she eats what drops on the floor lol.
This is a photo of the dress without a dog in it! 

Penguin!

I love penguins! So I made one! It's purple and funny looking and I have no idea how I did it.....but I did and that's what counts.  The biggest issue is I forgot about a tail but I think he's pretty cute!  Tell me what you think!


******UPDATE!!!!!!*******

Here is another penguin I did tonight! The pattern and tutorial for this one is at THIS site!  Have fun and I hope yours is less frustrating than mine!