This is my pinup dress! It took 6-8 hours to make. I made it for an event at a local bar. It was actually super easy to make. The only issue I had was the pattern I was using was a little to small for me. So I had to resize it! That too ended up being super easy! I'm loving these new tricks I'm learning. The pattern I ended up using came from here. However I didn't follow it exactly. I used this tutorial to resize the pattern. This slashing and cutting method was amazing. However, it made the top a little big still. So as a result there was a lot of taking in on this dress. To get the full instructions of how I made this dress go to my burdastyle page. I have decided that I will post most of my instructions and tutorials there. I hope you enjoy the rest of my pics and try to make one yourself!
I'm new to sewing. This blog is all about the things I am learning to make. I will be making this into a second income for myself and this will be my major site! Enjoy what I have to offer!
Showing posts with label tutorial. Show all posts
Monday, February 4, 2013
Friday, January 18, 2013
These are my little gnomes! sorry, I don't have pictures of their cute little faces. I made them for several people this year. They were quick and super easy to make. There is a tutorial out there somewhere but I don't remember where and I made some slight adjustments.
1) cut a 5x5" square. fold in half and sew the two sides together. grab the middle of both sides and fold in half again to sew the two sides together. make sure to leave the top open. It should resemble a bag.
2) Stuff your little bag. You can also put rice or beans in the bottom so it sits right. I didn't.
3) get a good sized bead. I had to grab a dremel and make the wholes bigger, well, my husband did. grab the top of the stuffed ball thing and twist it til you can shove it through the bead. Shove it. i used needle nose pliers to pull the fabric through once enough came out the top.
4) I trimmed the top of the fabric and hot glued it in place on the bead.
5) using felt, cut a triangle big enough to go around the bead. sew it into a hat shape, turn so the seam is inside. Hot glue the hat onto the bead.
6) draw some cute little faces using a fine point sharpie.
There you have it. I made around 10 or 15 of these in just a short time. they make great little gifts. and did you know that gnomes are a symbol of luck. so when you give them out make sure that people know that they are to watch over them and bring them years of luck! happy sewing!
1) cut a 5x5" square. fold in half and sew the two sides together. grab the middle of both sides and fold in half again to sew the two sides together. make sure to leave the top open. It should resemble a bag.
2) Stuff your little bag. You can also put rice or beans in the bottom so it sits right. I didn't.
3) get a good sized bead. I had to grab a dremel and make the wholes bigger, well, my husband did. grab the top of the stuffed ball thing and twist it til you can shove it through the bead. Shove it. i used needle nose pliers to pull the fabric through once enough came out the top.
4) I trimmed the top of the fabric and hot glued it in place on the bead.
5) using felt, cut a triangle big enough to go around the bead. sew it into a hat shape, turn so the seam is inside. Hot glue the hat onto the bead.
6) draw some cute little faces using a fine point sharpie.
There you have it. I made around 10 or 15 of these in just a short time. they make great little gifts. and did you know that gnomes are a symbol of luck. so when you give them out make sure that people know that they are to watch over them and bring them years of luck! happy sewing!
Wednesday, October 31, 2012
Halloween decorations---towels
These were so easy to make, I think I'll make some for thanksgiving, christmas, etc. I love how they make my kitchen more homey too. These were cheap too. I think I paid less than $10 to make these. Most of the stuff was 70% off at Jo-Anns.
For this one the towel was too big. So I had to cut it in half. I then pleated the towel at the cut end and sewed it into the fabric. I doubled the fabric so it was like putting a glove on a hand when i put the towel in the fabric. I added a button to hook it! so simple.
This was actually the first one I made and I didn't make it real tall. It was enough to hang the towel, but not as much as the other. This towel was also the right length that I wanted so I didn't have to cut anything. super simple, super quick!
For this one the towel was too big. So I had to cut it in half. I then pleated the towel at the cut end and sewed it into the fabric. I doubled the fabric so it was like putting a glove on a hand when i put the towel in the fabric. I added a button to hook it! so simple.
This was actually the first one I made and I didn't make it real tall. It was enough to hang the towel, but not as much as the other. This towel was also the right length that I wanted so I didn't have to cut anything. super simple, super quick!
Monday, October 22, 2012
Halloween Creation (no sew)
I made a neat little Halloween creation that had no sewing involved. It took a few hours because paint had to dry. This was a really simple project. It was also super cheap....I think it may have cost $20!!! First I'll talk about the base!
The base was way cheap. I brought home two boxes from work, then covered them in a white vinyl table cloth. We have a lot of wind and weather here in utah so I completely covered the boxes in case of wet weather and taped the table cloth to keep it from flying away. I then wrote Happy Halloween with orange paint. I taped the little scarecrows on and hot glued all the leaves on. I bought two bags of leaves. I didn't use them all so I can have some for next year. So that's it. boxes, table cloth, tape and decorations!
Next, the pumpkins!!!
This is my spider. I started with painting the whole thing black with acrylic paint. I did two coats. I used hot glue to place the eyes and legs. I used 4 pipe cleaners for legs. I then used red paint for the mouth.....his tongue is sticking out lol. Very easy, however it took a while to dry.
My witch. Take a pumpkin and paint it green! While it's drying, start the skirt. I used elastic and tulle. I tied the tulle to the elastic. the amount of each depends on the size of your pumpkin. I again did two coats of paint on the punpkin. If you don't the orange will show through. Once Dry, I glued the skirt and hat on. I then glued on the hair and eyes, followed by painting on the mouth.
There. Simple, easy, and cheap!!! Hope you like my creation and hope everyone has a Wonderful Halloween!!!!!
Here is a close up of the creation:
The base was way cheap. I brought home two boxes from work, then covered them in a white vinyl table cloth. We have a lot of wind and weather here in utah so I completely covered the boxes in case of wet weather and taped the table cloth to keep it from flying away. I then wrote Happy Halloween with orange paint. I taped the little scarecrows on and hot glued all the leaves on. I bought two bags of leaves. I didn't use them all so I can have some for next year. So that's it. boxes, table cloth, tape and decorations!
Next, the pumpkins!!!
This is my spider. I started with painting the whole thing black with acrylic paint. I did two coats. I used hot glue to place the eyes and legs. I used 4 pipe cleaners for legs. I then used red paint for the mouth.....his tongue is sticking out lol. Very easy, however it took a while to dry.
My witch. Take a pumpkin and paint it green! While it's drying, start the skirt. I used elastic and tulle. I tied the tulle to the elastic. the amount of each depends on the size of your pumpkin. I again did two coats of paint on the punpkin. If you don't the orange will show through. Once Dry, I glued the skirt and hat on. I then glued on the hair and eyes, followed by painting on the mouth.
There. Simple, easy, and cheap!!! Hope you like my creation and hope everyone has a Wonderful Halloween!!!!!
Tuesday, September 11, 2012
My dress form--tutorial
So I have been seeing people online have been making their own dress forms out of all sorts of things. After finding this out, I decided to give it a try. I won't really know how it worked til I make some clothes. However, I think it looks alright. Well, I decided to do my own tutorial. Hopefully this will help anyone out there who, like me, is in need for a dress form but is poorer than poor.
THIS is where I got the idea!
Make sure you do a couple things first.....where a bra and a "tight" under shirt.
So lets get started. You need to start with materials. You need a shirt that is too large for you, for me I got a men's XXL T-Shirt from walmart (on sale for $3). You also need some duct tape. Depending on your size you shouldn't need more than 2 rolls. I bought 3 just in case. I only used 1 on the form and part of one for the end of the project. You also need some cardboard for stabilizing and some stuffing......
This is my shirt and tape.
You also need your trusty helper.....can't wrap yourself in duct tape. I chose my husband!
For cardboard.....I went and got some from work (walmart). and the stuffing came from old pillows that aren't being used.
Start wrapping the duct tape from. Start and the lowest point you want the form. I have a big butt so I started there. You can start lower or higher, depends on your shape.
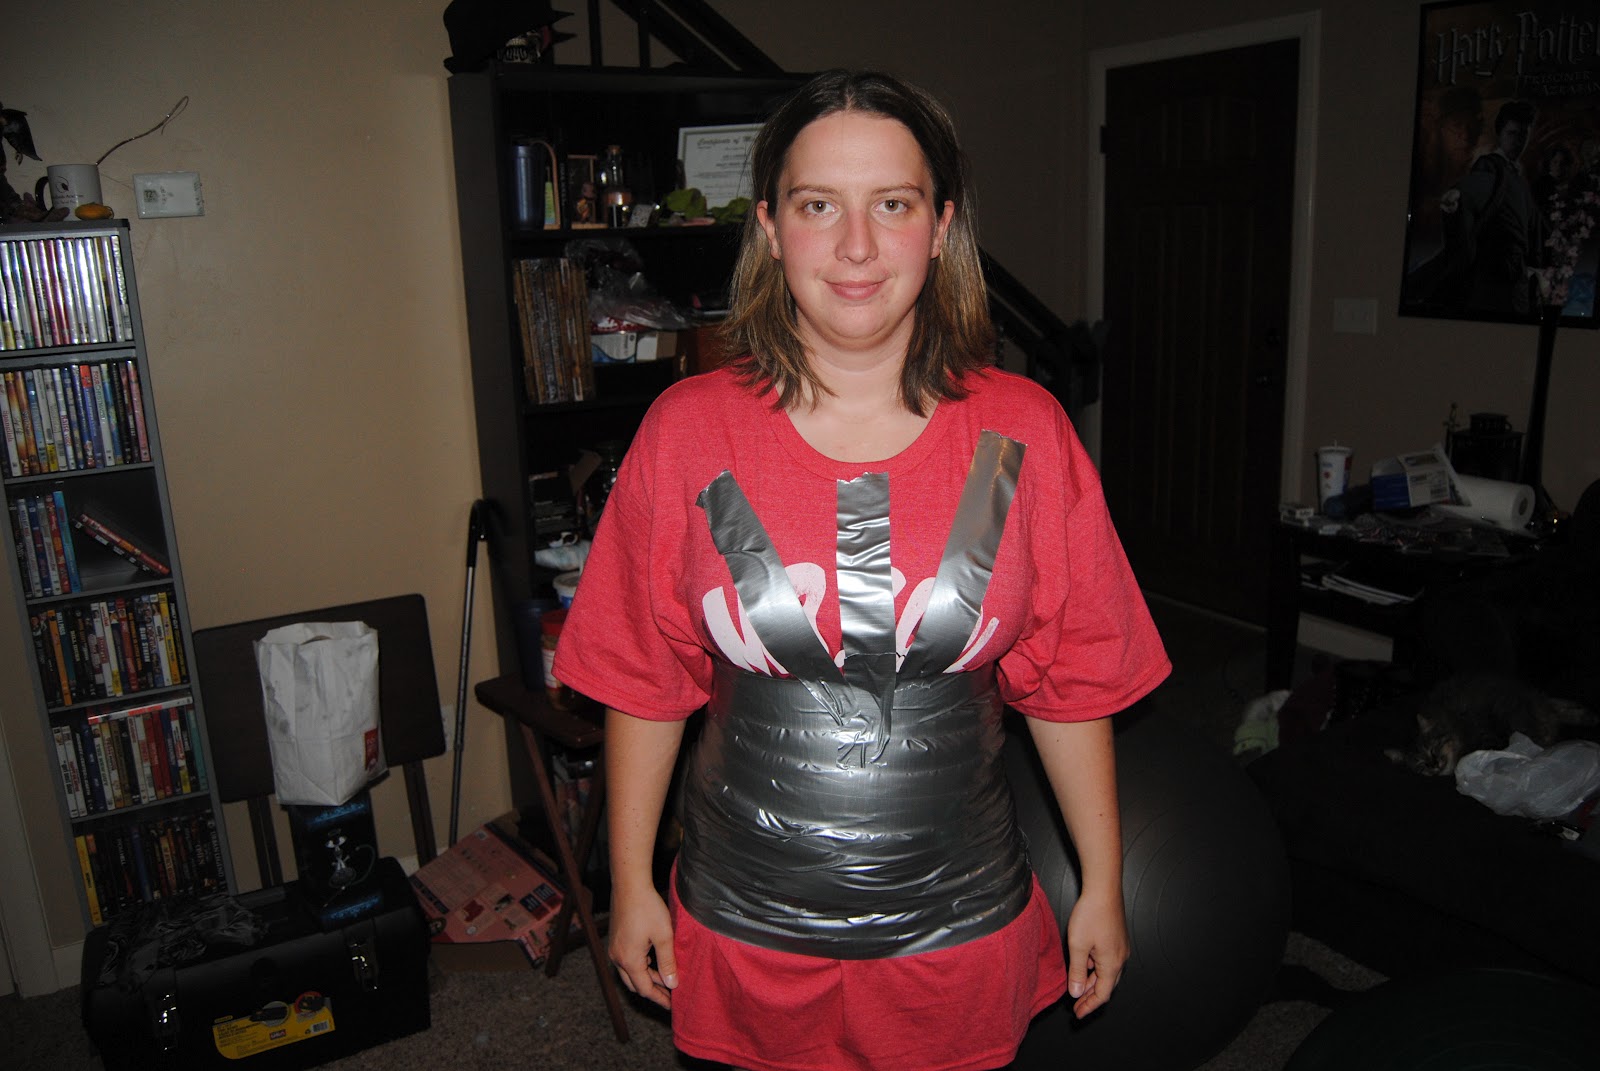
When you get to the chest, start wrapping the tape up and down instead of around. The up and down wrapping helps form the chest better. I tried going around, but it made the chest look flat.....up and down is definitely best.
Keep doing the up and down wrapping over your chest, shoulders and upper back.
While doing this, form the neckline you want and the arm holes.
When you get it wrapped to your satisfaction, draw and line down the center and and horizontal lines where you want them. I did one across the center of the chest, under the boobs, and across my belly button.
Very carefully, cut the form off on the back. Make sure not to cut the shirt or bra when you are cutting this. After you cut slip the form off very carefully and, without overlapping, carefully tap over the cut to finish your form.
Cut out the cardboard to fit the bottom of the form and tape it to the form (sorry no pics of this). then stuff your form from the top. You can also put card board in the arm holes to help those keep shape. Where this is my first form I was getting tired so I didn't do that part.
When you are done with your form it should look a little like this.
You can stick a hanger in the top to hang it....which is what I plan. I am going to put a hook in the ceiling and hang it from that when using and putting it in the closet when I'm not. OR, you can make a pole out of cardboard or whatever and afix your form to that. I'm not that handy so you can figure that out.
I hope my dress form works out for me. I'm going to be making my first item using it tomorrow! I'm going to be making a jumper so look out for another tutorial. It'll be great if this works. I am looking at getting a dress form from amazon at some point.....one of those adjustable ones. But for now, this should work. Hope you enjoyed the tutorial and hope it helps you make your own dress form!
THIS is where I got the idea!
Make sure you do a couple things first.....where a bra and a "tight" under shirt.
So lets get started. You need to start with materials. You need a shirt that is too large for you, for me I got a men's XXL T-Shirt from walmart (on sale for $3). You also need some duct tape. Depending on your size you shouldn't need more than 2 rolls. I bought 3 just in case. I only used 1 on the form and part of one for the end of the project. You also need some cardboard for stabilizing and some stuffing......
This is my shirt and tape.
You also need your trusty helper.....can't wrap yourself in duct tape. I chose my husband!
For cardboard.....I went and got some from work (walmart). and the stuffing came from old pillows that aren't being used.
Start wrapping the duct tape from. Start and the lowest point you want the form. I have a big butt so I started there. You can start lower or higher, depends on your shape.
When you get to the chest, start wrapping the tape up and down instead of around. The up and down wrapping helps form the chest better. I tried going around, but it made the chest look flat.....up and down is definitely best.
Keep doing the up and down wrapping over your chest, shoulders and upper back.
While doing this, form the neckline you want and the arm holes.
When you get it wrapped to your satisfaction, draw and line down the center and and horizontal lines where you want them. I did one across the center of the chest, under the boobs, and across my belly button.
Very carefully, cut the form off on the back. Make sure not to cut the shirt or bra when you are cutting this. After you cut slip the form off very carefully and, without overlapping, carefully tap over the cut to finish your form.
Cut out the cardboard to fit the bottom of the form and tape it to the form (sorry no pics of this). then stuff your form from the top. You can also put card board in the arm holes to help those keep shape. Where this is my first form I was getting tired so I didn't do that part.
When you are done with your form it should look a little like this.
You can stick a hanger in the top to hang it....which is what I plan. I am going to put a hook in the ceiling and hang it from that when using and putting it in the closet when I'm not. OR, you can make a pole out of cardboard or whatever and afix your form to that. I'm not that handy so you can figure that out.
I hope my dress form works out for me. I'm going to be making my first item using it tomorrow! I'm going to be making a jumper so look out for another tutorial. It'll be great if this works. I am looking at getting a dress form from amazon at some point.....one of those adjustable ones. But for now, this should work. Hope you enjoyed the tutorial and hope it helps you make your own dress form!
Subscribe to:
Posts (Atom)