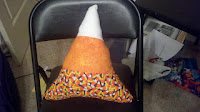
This ghost was fairly simple to make. Anyone can do it. All I did was cut a circle thing into to pieces of fabric. sewed each circle to a piece of square fabric. I then sewed the pieces together. I left the underside of the circle open. Stuffed the head, and hand stitched the hole closed. I used a sharpie for the faces (a diff face on each side). Tore strips in the squares. It was simple, fast, and turned out nice!
I'm new to sewing. This blog is all about the things I am learning to make. I will be making this into a second income for myself and this will be my major site! Enjoy what I have to offer!
Wednesday, October 31, 2012
Halloween decorations---living room
This ghost was fairly simple to make. Anyone can do it. All I did was cut a circle thing into to pieces of fabric. sewed each circle to a piece of square fabric. I then sewed the pieces together. I left the underside of the circle open. Stuffed the head, and hand stitched the hole closed. I used a sharpie for the faces (a diff face on each side). Tore strips in the squares. It was simple, fast, and turned out nice!
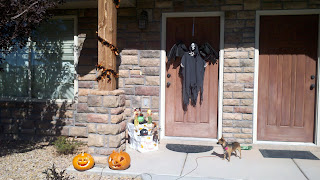
Halloween decorations---outside

These are our pumpkins. Mine is on the left, and Lee's is on the right. Mine was a design from a book, I decided to do something a little more complicated than a smilie face. My husband, lee, did a devil. The weather turned warm here in utah and as a result, our pumpkins died fast! I took this picture after they were out for two days! On halloween night they looked like total crap, but, what do you do? normally its 30 degrees in oct. not 70!!!!
Halloween decorations---towels
For this one the towel was too big. So I had to cut it in half. I then pleated the towel at the cut end and sewed it into the fabric. I doubled the fabric so it was like putting a glove on a hand when i put the towel in the fabric. I added a button to hook it! so simple.
This was actually the first one I made and I didn't make it real tall. It was enough to hang the towel, but not as much as the other. This towel was also the right length that I wanted so I didn't have to cut anything. super simple, super quick!
Monday, October 22, 2012
Halloween Creation (no sew)
The base was way cheap. I brought home two boxes from work, then covered them in a white vinyl table cloth. We have a lot of wind and weather here in utah so I completely covered the boxes in case of wet weather and taped the table cloth to keep it from flying away. I then wrote Happy Halloween with orange paint. I taped the little scarecrows on and hot glued all the leaves on. I bought two bags of leaves. I didn't use them all so I can have some for next year. So that's it. boxes, table cloth, tape and decorations!
Next, the pumpkins!!!
This is my spider. I started with painting the whole thing black with acrylic paint. I did two coats. I used hot glue to place the eyes and legs. I used 4 pipe cleaners for legs. I then used red paint for the mouth.....his tongue is sticking out lol. Very easy, however it took a while to dry.
My witch. Take a pumpkin and paint it green! While it's drying, start the skirt. I used elastic and tulle. I tied the tulle to the elastic. the amount of each depends on the size of your pumpkin. I again did two coats of paint on the punpkin. If you don't the orange will show through. Once Dry, I glued the skirt and hat on. I then glued on the hair and eyes, followed by painting on the mouth.
There. Simple, easy, and cheap!!! Hope you like my creation and hope everyone has a Wonderful Halloween!!!!!
Sunday, October 21, 2012
Halloween Costumes part 1
 I made my very own Patchwork Cloak. This is my Halloween Costume this
year. Sorry, Pics aren't the best. This took me a week to sew it all
together. Took me about a month to cut all the squares. I did the dogs
costume about a month or two ago. That one only took me a day to cut
and sew. I still have to make my husbands cape. We are modern day
Gleemen. If you don't know what a Gleeeman is read the Wheel of Time
series by Robert Jordan and Brandon Sanderson. My husband read the
series and got the idea. I made my cloak for under 30 bucks. You can
buy similar coats for any amount....the most expensive I have found was
in the $500 range.....I have not found one under $75. This was made
with absolutely no pattern. I took my measurements....even those were
used loosely. I kept having to add and subtract squares as I was
sewing. For the sleeves I had to add a whole section to each to get
the shape I wanted. I also used an old sweatshirt to mark the size of
the sleeve whole I needed. It was a little big so I took in the
shoulders a tiny bit to compensate. It was fairly easy to make. Once
all the squares were sewn together it took maybe 2.5 days to sew it all
together. It was fun and easy. I lined the whole thing with plain
black cotton fabric. I can't wait to finish Lee's and post pictures of
all of us in our costumes.
Sophie in all her glory modeling for the camera!!!
Friday, October 5, 2012
Hootie the camaflouge owl
This is my little owl hootie. The name came from my past. All my sisters and I have names that start with H. My brother used to try and address one of us and would run through the list really fast to the point would get all tongue tied and yell HOOTIE! Therefore I named my little owl after that. I made the owl for my dad and he likes to hunt and fish therefore I made the owl camaflouge. I hope he likes it. Also an interesting fact....I made my own pattern for this little guy. Attaching the wings was difficult but I managed. It was fun and took right around an hour with making the pattern. If you wish to have the pattern let me know.

Monday, October 1, 2012
Puppy pj shirt
I made a little pj shirt for my little girl. It was fairly easy. I used fleece and traced a shirt I already had for her. It should keep her nice and warm this winter as it gets pretty cold out.


